
Nani's Living In Luxury
Well, maybe not luxury but she's sure upgraded. Last summer when we took her home I wanted to have a nice play gym for her to enjoy but couldn't afford to buy one. Caiques are quite expensive and I bought the largest cage I could find so my funds were pretty much wiped out. I decided to make my own out of tree branches. So I did some research to be sure I'd be giving her branches that weren't poisonous and ended up choosing Sumac (not Poison Sumac mind you, Rhus typhina which is not poisonous at all and it's flowers can even be consumed). It didn't turn out too bad but it definitely looked home made. Another problem was since the branches sprawled out so much I had to lay newspaper all over the surrounding floor which looked bad and never stayed in place so I had bird bombs all over the place anyway.


Follow This Blog
Hello to all my new readers! Nani and I would like to thank you for stopping by. Please note that on the right side of the page, just below "Categories" is a link to "Follow This Blog". Once you click on the link you will be able to choose to follow publicly or privately. By choosing to follow The Doodle Bird Blog you can stay updated with this blog's posts on your Blogger Dashboard.
How-to: The Foraging Cup
Supplies:
- 1 unfinished wooden cup with loose fitting lid (can be found at most craft stores)
- 1 wooden flower cutout
- 1 quick link clasp
- 12" section of nickel plated chain
- 1 bird safe bell

1. Start by drilling a small hole in the center of the flower cutout, wooden box, and lid. You may also want to dye the pieces different colors using food grade coloring.

2. Attach the bell at one end, and thread the other end through the holes starting at the bottom of the box. Finally, attach the quick link clasp at the top and hang.

3. Put one of your birds favorite treats in the cup. At first you may want to show him what you're putting in. For some you may need to demonstrate how to get the treat out. Give it some time, eventually he will get it.
DIY: Foraging Tree
Materials:
- 1 unfinished wooden box
- rocks
- "Great Stuff" foam
- 1 bird safe tree branch
- 1 24" x 24" wood board (not shown)
- toys
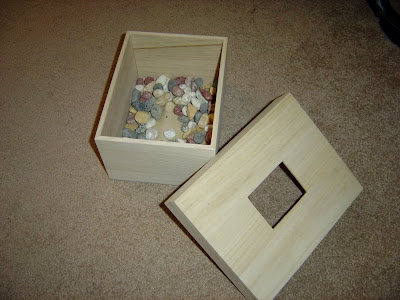
Purchase unfinished wooden box from a craft store. Some of them come with a hole already in the top. Otherwise you can drill a hold the size of the base of the branch. Fill the bottom with rocks, the heavier the better.
Not Shown: Before adding the rock, attach a 24" x 24" wooden plank to the bottom side of the box for extra support to prevent the tree from falling over.


Fill the box with "Great Stuff" foam 1/2 to 2/3 from the top of the box completely covering the rock. This stuff expands significantly as it dries.

Place tree branch into the hole in the wet foam. I have used a Staghorn Sumac tree (NOT Poison Sumac!). It's ok leave the leaves on the tree branch, your bird will have lots of fun pulling them off. You will have to support the tree upright while the foam dries. Leave it overnight to become firm. If some of the foam comes out through the whole simply remove the excess with a knife. To prevent your bird from chewing at the foam you can place wood blocks into the open areas. Now it is ready for toys to be hung!


Make Your Own T-Stand
Supplies:
- 4 Stainless Steel Siding Nails
- 1 - 1 in. x 36 in. Wood Dowel
- 1 Rectangular 8 x 10 in. Wood Plaque (unfinished)
- Hammer
- Ruler/Tape Measure
- Small Saw

1. Cut the wood dowel in three equal parts of 12" each. You can sand the edges to get rid of any splinters. Bottom side of plaque: measure out 2" from both of the shorter sides and make a small mark with a pencil. Then measure in 5" from the long sides and line up the pencil marks. (This is not a true T-stand because I've chosen to have two dowels at the base. This makes it easier for trick training, such as The Flip)

2. Align dowel on front side of plaque and hold in place, then turn over and place nail on the pencil mark. Hammer the nail in until it is flat with the surface of the plaque. (You can use a drill, and screws work as well)

3. Place third dowel horizontally and evenly on the top and nail it on. Make sure nails are flush with the surface of the dowel to avoid injuries to the bird.
Voila!


 Posts


